Email Link Tracking for Your Shopify Store
Let's be real—staring at email open rates only tells you half the story. The real magic happens when you understand what your customers do after they open your email. This is where email link tracking becomes your most powerful tool. It's like having a direct line into your customer's mind, showing you exactly which products grab their attention and what deals actually make them buy.
Unlocking Growth on Shopify with Smart Links
Think about it. You send out a flash sale email. Within minutes, you know exactly which featured product is generating all the buzz and driving the most traffic to your store. That’s the power we’re talking about here. We're turning standard emails into intelligent, data-rich campaigns that inform smarter business decisions.
It’s time to move past vanity metrics. The true value is in decoding user intent, and every single click is a signal. Each time a customer clicks a link, they're handing you a piece of valuable data, telling you precisely what they care about in that moment.
What Clicks Are Really Telling You
When a subscriber clicks a link in your email, they're doing more than just visiting a page. They're showing you what they want. Are they drawn to the new seasonal collection, a specific handbag, or the flashy "20% Off" banner? Each choice tells a unique story about your audience.
- Product Popularity: Clicks on specific product links are a dead giveaway for what's hot. This is gold for planning inventory and figuring out what to develop next.
- Offer Effectiveness: Are people clicking the discount links? This shows you which incentives are actually persuasive enough to get a response.
- Content Engagement: If you link to blog posts or style guides, tracking those clicks tells you what content your audience loves, helping you build a much stronger brand connection beyond just selling products. For any Shopify merchant, this isn't just numbers on a screen; it's the key to fine-tuning your entire sales funnel. Let's say you email three products, and 90% of the clicks go to just one of them. That's a massive, blinking sign telling you to push that item harder in your next campaign, on your homepage, and even in your social ads.
The math is straightforward: (Total Clicks ÷ Number of Delivered Emails) × 100. So, if 1,000 emails go out and 40 people click a link, your CTR is 4%. Considering the e-commerce industry average hovers around 2.6%, anything above that is a solid win. For a deeper dive into these kinds of KPIs, you can find great resources on sites like Metric-Watch.
Core Email Link Tracking Metrics at a Glance
To really get good at this, you need to know what you're looking at. The table below breaks down the essential metrics that turn raw click data into powerful strategies for your Shopify store.
| Metric | What It Measures | Why It Matters for Shopify |
|---|---|---|
| Click-Through Rate (CTR) | The percentage of recipients who clicked a link. | Shows how compelling your email's content and call-to-action are. A low CTR might mean your copy is weak or the offer isn't hitting home. |
| Clicks Per Unique Open | The ratio of clicks to unique opens. | Helps you see if you just have a catchy subject line (high opens) or if your email content is genuinely engaging (high clicks per open). |
| Conversion Rate | The percentage of clickers who complete a purchase. | This is your ultimate ROI metric. It directly connects a specific email campaign to actual sales revenue in your Shopify dashboard. |
| Most-Clicked Links | Identifies which specific links got the most clicks. | Reveals exactly what products, offers, or content pieces are the most popular, giving you clear direction for your merchandising and promotions. |
Once you start consistently monitoring these metrics, you’ll find yourself shifting from guesswork to data-backed confidence. You'll stop wondering what your customers liked and start knowing, "They loved that product, and this discount code drove the most sales." This is how you build a smarter, more resilient e-commerce business.
Creating Trackable Shopify Checkout Links
Alright, let's move from theory to action. This is where you get your hands dirty and start building the special URLs that do the heavy lifting for your email campaigns. We're going to create a link that not only whisks a customer to the checkout with specific products already in their cart but also carries all the tracking data you need to see exactly what’s working.
Think about it this way: you're collaborating with a new influencer. Instead of just sending them a generic link to your homepage and hoping for the best, you can give them a unique URL. This link instantly adds your hot new "Sunrise Glow Serum" to their followers' carts. It’s a simple move, but by removing that friction, you dramatically boost your chances of making the sale.
This is the magic of a properly tracked link—it captures the click and translates that action into hard data.
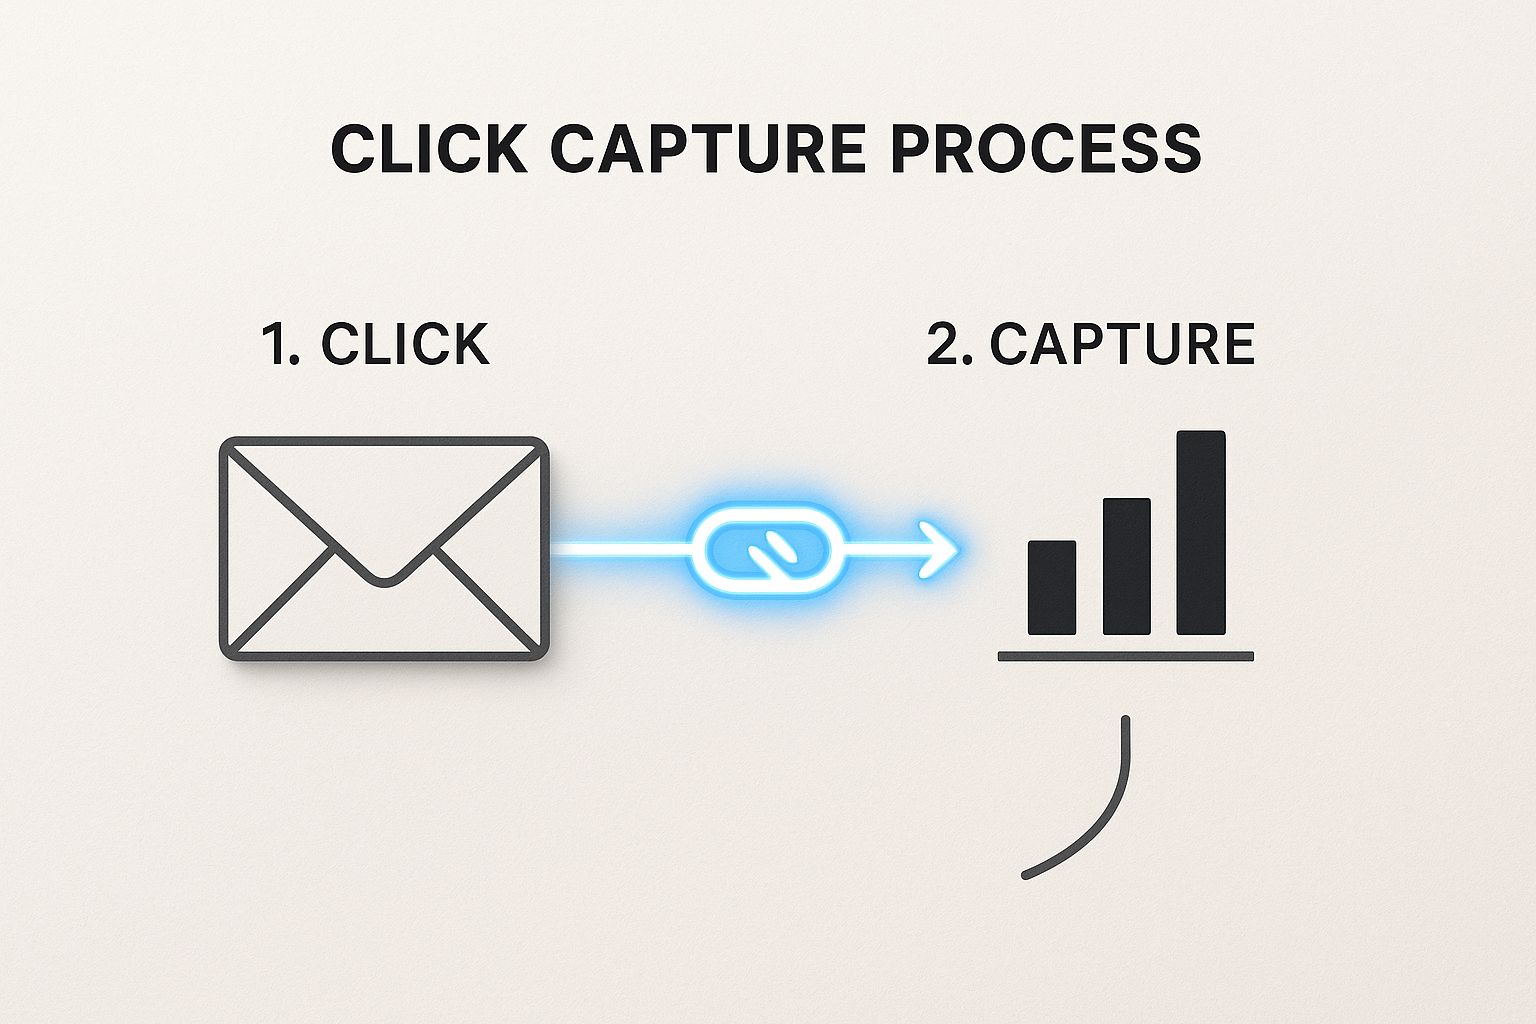
As you can see, every single click becomes a captured event. This information feeds directly into your analytics, painting a crystal-clear picture of how your campaign is performing in real time.
Generating the Base Checkout Link
First things first, you need to grab the base URL from your Shopify admin. This is the foundation we’ll build on, and thankfully, you don't need to write a single line of code.
This handy feature is tucked away on your product pages. Shopify has a built-in function to create a shareable checkout link for any product in your store.
To get started, just navigate to the product you want to promote. Click the "More actions" dropdown menu and hit "Create checkout link." Boom. Shopify instantly generates the URL and copies it to your clipboard.
When a shopper clicks this link, they’ll bypass the product page and go straight to the checkout with that item already waiting for them. It’s a shortcut to conversion.
Adding UTM Parameters for Precision Tracking
Now for the part that makes your email link tracking so powerful: adding UTM parameters. A plain checkout link is good, but a tagged one is what tells you the story behind the sale. UTMs (Urchin Tracking Modules) are just simple bits of text you add to a URL to tell Google Analytics where your clicks are coming from.
While there are five standard UTM parameters, for most email campaigns, you’ll really only need to focus on three:
- utm_source: This identifies where the traffic is coming from. For email, this might be your platform (
klaviyo) or a specific list (monthly_newsletter). - utm_medium: This explains the marketing channel you used. For our purposes, this will almost always be
email. - utm_campaign: This is where you name your specific promotion. Be descriptive! Something like
spring_sale_24orinfluencer_collab_janeworks great. Let's see it in action. Imagine your base checkout link from Shopify is:https://yourstore.myshopify.com/cart/123456789:1
You'll append your UTMs to the end of that URL. Start with a question mark (?) and then separate each parameter with an ampersand (&).
Your final, fully trackable link would look something like this:
https://yourstore.myshopify.com/cart/123456789:1?utm_source=klaviyo&utm_medium=email&utm_campaign=sunrise_serum_launch
This clean, structured URL ensures that every click from your "Sunrise Serum Launch" campaign sent through Klaviyo is correctly attributed. This kind of consistency is the bedrock of reliable data.
The Power of Consistent Tagging
The real magic happens when you do this over and over again. By consistently tagging every link in every email, you start building a rich dataset that reveals incredibly powerful insights about your business.
You’ll be able to compare the performance of different campaigns side-by-side, see which email lists drive the most revenue, and truly understand which promotions resonate with your audience. For a deeper dive into this, our guide on using Checkout Links for Shopify as a marketing tool offers some fantastic strategies.
Without this tagging discipline, your analytics reports will be clogged with "direct" or "unknown" traffic sources. You'll be left guessing what's actually driving sales. Taking a few extra seconds to correctly tag each link is one of the highest-return activities you can do. It transforms your email marketing from a shot in the dark into a precision tool for growth.
Building Advanced Links for Targeted Campaigns
Alright, this is where the real magic happens. Moving beyond basic, one-product links allows you to truly sharpen your marketing and build hyper-specific, high-intent shopping experiences. This level of control is what separates a good campaign from a truly great one.
Imagine running a "Build Your Own Bundle" promotion. Instead of forcing customers to hunt down three different items and add them to their cart one by one, you can create a single, powerful link that does it all for them. Even better, that same link can automatically apply a unique discount code, creating a seamless journey from email click to checkout.
This is a game-changer for so many marketing scenarios. I've seen it work wonders for abandoned cart recovery emails, exclusive VIP offers, and targeted upsell campaigns where you want to present an irresistible, pre-packaged deal.
Crafting Multi-Product Checkout Links
Let's start with a classic: creating a link for a product bundle. Say you want to offer a "Skincare Starter Kit" that includes a cleanser, a serum, and a moisturizer. The entire goal is to make it dead simple for the customer to buy all three at once.
To get this done, you'll need the specific Variant IDs for each product. You simply string them together in the URL, separated by commas, and specify the quantity for each.
The structure looks like this:
yourstore.com/cart/VARIANT_ID_1:1,VARIANT_ID_2:1,VARIANT_ID_3:1
When someone clicks that link, voilà! All three products are instantly in their cart. All the friction is gone. This is incredibly powerful for new product launches when you want to encourage customers to try a complete set.
Automatically Applying Discounts to Links
Pre-loading a cart is great, but sweetening the deal with an instant discount is even better. You can easily add a discount parameter to your checkout link that automatically applies a coupon code you've already created in your Shopify admin.
Let's build on our skincare bundle. You've got the three-product link, and now you want to apply a "BUNDLE15" code for 15% off.
The link would now look like this:
yourstore.com/cart/VARIANT_ID_1:1,VARIANT_ID_2:1,VARIANT_ID_3:1?discount=BUNDLE15
Now, when a customer clicks, their cart is not only pre-filled, but the 15% discount is already reflected in the total. This is an absolutely killer tactic for flash sales where the discount is a core part of the pitch.
This level of control over the user journey is critical. With an estimated 392 billion emails sent daily worldwide, you need more than a catchy subject line to stand out. You need a frictionless path to purchase. Data shows segmented campaigns can boost revenue by up to 760%, and advanced email link tracking is the engine that makes this hyper-targeting possible. If you're curious, you can learn more about the power of personalization in marketing from recent performance stats.
Pre-filling Customer Information for a Flawless Checkout
For the ultimate white-glove experience—especially in cart recovery—you can even pre-fill the customer's checkout details. By adding their information to the URL, you can send them straight to a checkout page where their email, name, and address are already populated.
This is your secret weapon for winning back high-intent shoppers. Imagine a customer who abandoned their cart getting an email with a link that takes them to a pre-filled checkout. The process feels effortless and deeply personal.
Your final, fully-loaded link might look something like this:
yourstore.com/cart/VARIANT_ID:1?discount=COMEBACK10&checkout[email]=customer@email.com&checkout[shipping_address][first_name]=Jane
This is the pinnacle of targeted link building. It's not just a link; it's a direct, personalized invitation to complete a purchase with zero hassle. By mastering these advanced structures, you transform your email campaigns from simple broadcasts into sophisticated, high-conversion engines tailored to individual customer journeys.
Turning Your Link Data into Actionable Insights

This is where the magic happens. You’ve done the hard work of setting up your links, your campaign is out in the wild, and the data is starting to roll in. But numbers on a screen are just that—numbers. The real skill is translating that raw data into strategic decisions that move the needle for your business.
Effective email link tracking goes way beyond just counting clicks. It’s about drawing a straight line from a specific link in an email to actual traffic, on-site behavior, and most importantly, revenue. This is how you stop making educated guesses and start making data-backed choices that genuinely grow your Shopify store.
Where to Find Your Tracking Data
Your campaign's story will unfold in two main places: your Shopify dashboard and Google Analytics. Think of them as two different camera angles on the same event, each giving you a unique perspective.
- In Shopify Analytics: Your first stop should be
Analytics > Reports > Sales by traffic source. This is your direct line to revenue. By filtering for theutm_source,utm_medium, andutm_campaignyou set up, you can see exactly which email drove a specific sale. It's clean, simple, and powerful. - In Google Analytics 4 (GA4): For a deeper dive, head over to
Reports > Acquisition > Traffic acquisition. This report is a goldmine. You can add "Session campaign" as a secondary dimension to see precisely how people from your email campaign behaved once they landed on your site—what pages they explored, how long they stuck around, and whether they hit any key conversion goals you’ve set up. Understanding the full customer journey is crucial. Mastering landing page traffic source tracking gives you that complete picture, from the moment they click your link to the final checkout confirmation.
Decoding the Story Your Data Is Telling
Let's walk through a real-world example. Imagine you’re A/B testing a campaign for a new sundress. Email A has a link with a beautiful lifestyle photo, and Email B uses a link with a crisp, clean studio shot of the dress. You tag them with utm_campaign=sundress_lifestyle and utm_campaign=sundress_studio.
A couple of days later, you check your analytics. You might find that the lifestyle photo link got 30% more clicks—a fantastic click-through rate. But then you notice something interesting: the studio shot link led to a 15% higher conversion rate.
What's the takeaway here? The lifestyle image was a scroll-stopper, great for grabbing attention and sparking initial interest. However, the customers who were ready to buy responded better to the clear, detailed product shot. This one insight is incredibly valuable and can shape your creative strategy for every campaign moving forward.
Interpreting Your Campaign Data
The table below breaks down the key metrics you'll be watching. Use it as a quick guide to understand what the numbers are telling you and what strategic questions you should be asking yourself.
| Metric | What a High Value Means | What a Low Value Means | Actionable Question to Ask |
|---|---|---|---|
| Click-Through Rate (CTR) | Your email subject line, creative, and call-to-action were highly effective at grabbing attention. | Your offer or creative may not be resonating, or your audience targeting could be off. | "Did my lifestyle image get more clicks than the product shot?" |
| Conversion Rate | The audience was highly motivated, and the journey from email to checkout was seamless and persuasive. | There might be friction on your product page, pricing issues, or the offer wasn't compelling enough. | "Why did the discount code offer convert better than the free shipping offer?" |
| Revenue Per Email | This email campaign is a top performer, effectively turning subscribers into paying customers. | The campaign might not be profitable, or it's attracting low-intent browsers instead of buyers. | "Which audience segment (VIPs vs. new subscribers) generated more revenue?" |
| Average Order Value (AOV) | You successfully encouraged customers to buy more, perhaps through bundles or upsells in the email. | Customers are only buying the promoted item and not exploring other products. | "Did including 'related products' in the email increase the average cart size?" |
This kind of analysis moves you beyond simple open and click rates and focuses on what truly matters: generating revenue and understanding customer behavior.
Answering Your Biggest Business Questions
When you consistently track your email links, you're building a powerful dataset that can answer the most critical questions about your store's growth.
Your data stops being a list of stats and becomes a strategic roadmap. You'll finally have concrete answers to questions like:
- Which of my customer segments is the most valuable? By tagging links sent to different lists (like VIPs, recent subscribers, or those who abandoned carts), you can see which group actually drives the most revenue.
- Did our big holiday sale actually work? Isolate your
utm_campaignfor "BlackFriday2024" and see exactly how many orders it generated, with zero guesswork involved. - What kind of content does my audience actually want? You can compare the performance of emails that link to a new blog post versus those that link directly to a product. The results will tell you what they truly find valuable. Ultimately, turning data into insight isn't a one-time task. It's a continuous cycle of asking questions, testing your assumptions, and refining your approach. Every email you send is a chance to learn something new about your customers, helping you build a smarter, more profitable marketing engine.
Avoiding Common Link Tracking Mistakes
Look, even the sharpest marketers can make small mistakes that throw their data completely out of whack. A simple typo or a forgotten parameter in a URL can send your analytics into a nosedive, leaving you with a messy, unreliable picture of what's actually working.
When it comes to email link tracking, precision is everything. Think of it this way: your data is only as good as the links you create. A broken link costs you a customer. A poorly tagged one costs you the insight. Let's dig into some of the most common—and easily avoidable—pitfalls I see all the time.
The Painfully Common Problem of Broken URLs
This one happens more than you'd think. You've poured hours into crafting the perfect email, but a tiny slip-up in the URL formatting renders a key link useless. Often, the culprit is an extra space, a missing character, or, most frequently, a misplaced symbol when building out your UTM parameters.
A classic mistake is using a question mark (?) more than once. Any URL can only have one ?. Every parameter that comes after it must be separated by an ampersand (&).
- This is wrong:
yourstore.com/cart/123:1?discount=SAVE10?utm_source=klaviyo - This is right:
yourstore.com/cart/123:1?discount=SAVE10&utm_source=klaviyoThat one tiny character swap can break the link entirely, or, just as bad, cause your analytics platform to ignore the UTMs. The click then gets dumped into the "direct" traffic bucket, and you lose all attribution.
Inconsistent and Messy UTM Tagging
Inconsistent UTM tagging is the silent killer of good data. If you don't have a clear, shared system, your campaign analysis becomes a nightmare. Imagine one person on your team uses utm_source=newsletter, another uses Newsletter, and a third decides to use monthly-email.
To Google Analytics, those are three completely different sources. Your data gets fragmented, making it impossible to see the true performance of your email efforts. This is why a standardized naming convention isn't just a "nice-to-have"; it's non-negotiable for serious brands.
Our Go-To UTM Naming Rules:
- Always use lowercase. It just eliminates case-sensitivity issues from the get-go.
- Use underscores (
_) instead of spaces.black_friday_saleis much cleaner for data systems thanblack friday sale. - Be descriptive but brief.
2024_q4_vip_offertells a story;promotells you nothing. Create a simple shared document or spreadsheet with these rules. This simple discipline is what separates the pros from the amateurs.
When Link Shorteners Steal Your Tracking Codes
Link shorteners like Bitly seem handy for cleaning up those long, clunky URLs, especially on social media. But for email link tracking, they can be a real troublemaker. Some email platforms and link shorteners just don't play nice, and in the process, they can accidentally strip away the UTM parameters you worked so hard to add.
When you shorten a link, you’re basically creating a redirect. The danger is that somewhere in that handoff, your tracking codes get lost. You get the click, but you have no idea where it came from.
The safest bet, especially inside an email, is to just use the full, tagged URL. Your email marketing platform is built to handle these. The customer only sees the button or hyperlinked text, so there's no aesthetic reason to shorten it. Stick with the full URL to make sure your tracking data arrives safe and sound.
Your Pre-Send Troubleshooting Checklist
Before any campaign goes out the door, run through this quick gut-check. Making this a habit will catch almost every common tracking error and ensure your data is something you can actually trust.
- Is every link clickable? Click them all in a test email.
- Do they go to the right page? Double-check every destination.
- Is every link tagged? Look for
utm_source,utm_medium, andutm_campaign. - Are the tags consistent? No caps, no spaces, just clean tags that follow your rules.
- Is the URL structure sound? One
?, and&for everything else. Building this checklist into your workflow is like a safety net for your data. You’ll stop mistakes before they cost you sales and insights, giving you the clean, actionable information you need to grow your store.
Frequently Asked Questions About Link Tracking
https://www.youtube.com/embed/110K3BGlAuw
Even after going through a detailed guide, a few questions always pop up once you start getting your hands dirty with email link tracking. I get it. Let’s walk through some of the most common questions I hear from Shopify merchants to get you past any sticking points.
Can I Track Clicks on Buttons in My Emails?
Yes, absolutely—and you definitely should. Buttons are usually your main call to action, so tracking them is non-negotiable.
Think of it this way: in pretty much any email marketing tool you use, a button is just a fancy, visual container for a hyperlink. The magic happens when you embed your fully tagged checkout link, packed with all your UTM parameters (utm_source, utm_medium, utm_campaign), as the button's destination URL.
When a customer clicks that big, beautiful "Shop Now" button, your email platform logs the click, and your analytics tools get all the data they need to credit the right campaign for the visit and, hopefully, the sale.
Does Link Tracking Slow Down My Emails or Website?
This is a common worry, but you can put it to rest. The short answer is no.
The technology behind link tracking is incredibly fast and efficient. When someone clicks your link, there's a split-second redirect through a tracking server (usually your email provider's) that records the click before sending the person to your Shopify store. This whole process happens in milliseconds. It's completely invisible to the user and has zero noticeable effect on their experience or your site's load time. The value you get from that data is well worth the blink-of-an-eye redirect.
How Do I Know if My Link Tracking Is Working Correctly?
The only way to be sure is to test everything before you hit "send" on a big campaign. Don't skip this part! Here’s my go-to checklist:
- Send a test email. Always send a draft of your campaign to yourself and maybe a coworker.
- Click every single link. Open the email in a real inbox (like Gmail, not the preview in your email tool) and click on everything—buttons, text links, even the logo.
- Check your analytics. Hop over to Google Analytics and look at the "Realtime" report. In GA4, the "DebugView" is perfect for this. You should see your visit show up instantly with all the correct UTM tags you assigned.
- Follow the journey. For checkout links, complete the process. Make sure the right products are in the cart and any discounts have been applied correctly.
What’s the Difference Between Tracking Links and Buttons?
Technically speaking, there’s almost no difference. Whether it's hyperlinked text or a clickable button, both are just pointing to a URL. The tracking code is attached to the URL itself, not the visual element the customer clicks on.
From a marketing strategy perspective, however, the difference is huge. Buttons are designed to stand out. They are visually dominant and almost always get a higher click-through rate for primary calls to action like "Shop Now" or "Get 20% Off." You can learn more about crafting high-impact campaigns in our guide to email marketing for Shopify.
My advice? Test both. See what your audience responds to. You might find that buttons work best for the main offer, while simple text links are great for secondary actions like "Read our blog" or "View size chart."
Ready to stop guessing and start knowing what drives sales? Checkout Links empowers you to create powerful, trackable checkout links that recover abandoned carts and boost your email marketing ROI. Ditch the complexity and start building smarter campaigns today.